CentOS7.9 搭建内部yum源服务器同步阿里yum源

环境说明:

1、企业内网需求:企业内部许多服务器是不能连接互联网,但每台centos主机安装软件包时都配置本地yum源很麻烦,也缺少第三方yum源,因此在内网搭建一台yum源服务器满足这一需求,同时网络层面策略只允许此yum源服务器每周日晚限时联网同步阿里云的yum源。

参考连接:http://blog.itpub.net/70004783/viewspace-2790196/

2、准备两台测试主机,一台用作yum源服务器(能连互联网),一台用作客户端。

3、系统版本:CentOS 7.9


实操步骤:

一、添加阿里云yum

备份原系统的repo

[root@yumserver ~]# mkdir /etc/yum.repos.d/backup
[root@yumserver ~]# mv /etc/yum.repos.d/*.repo /etc/yum.repos.d/backup

添加阿里云yum源并缓存(Centos-7.repo是软件仓库配置文件,epel-7.repo是扩展源、提供额外的软件包)

[root@yumserver ~]# curl -o /etc/yum.repos.d/CentOS-Base.repo https://mirrors.aliyun.com/repo/Centos-7.repo
[root@yumserver ~]# curl -o /etc/yum.repos.d/epel.repo http://mirrors.aliyun.com/repo/epel-7.repo
[root@yumserver ~]# yum makecache
[root@yumserver ~]# yum repolist

 二、安装相关软件

[root@yumserver ~]# yum install -y wget make cmake gcc gcc-c++ pcre-devel zlib-devel openssl openssl-devel httpd yum-utils createrepo

备注:

yum-utils:yum-utils是yum的工具包集合,reposync一个同步工具。
createrepo:createrepo是一个对rpm文件进行索引建立的工具,就是对指定目录下的rpm文件进行检索,把每个rpm文件的信息存储到指定的索引文件中,这样方便远程yum命令在安装更新时进行检索。
httpd:通过Apache软件提供web服务,也可以使用nginx。

三、同步阿里云yum源软件包到本地服务器指定目录/mirror(自定义目录)

创建存放软件包目录/mirror,(chown设置文件所有者和文件关联组,chmod控制用户对文件的权限)

[root@yumserver ~]# mkdir -p /mirror
[root@yumserver ~]# chown -R apache:apache /mirror
[root@yumserver ~]# chmod -R 755 /mirror

同步阿里云yum源软件包

###参数-n指下载最新软件包,-p指定目录,指定本地的源--repoid(如果不指定就同步本地服务器所有的源),下载过程比较久(10个小时左右)
[root@yumserver ~]# reposync -n --repoid=extras --repoid=updates --repoid=base --repoid=epel -p /mirror

[root@yumserver ~]# du -sh /mirror/*
9.0G    /mirror/base
16G     /mirror/epel
323M    /mirror/extras
3.3G    /mirror/updates

四、创建仓库索引

createrepo -po /mirror/base/ /mirror/base/
createrepo -po /mirror/extras/ /mirror/extras/
createrepo -po /mirror/updates/ /mirror/updates/
createrepo -po /mirror/epel/ /mirror/epel/

五、更新数据源

createrepo --update /mirror/base/
createrepo --update /mirror/extras/
createrepo --update /mirror/updates/
createrepo --update /mirror/epel/

六、启动并配置Apache服务

6.1、启动Apache(httpd)服务(如果没有httpd,需要yum install -y httpd 安装一下)

[root@yumserver ~]# systemctl start httpd
[root@yumserver ~]# systemctl enable httpd
[root@yumserver ~]# systemctl status httpd

6.2、系统防火墙放行80端口(apache服务使用的是80端口)

[root@yumserver ~]# firewall-cmd --permanent --zone=public --add-port=80/tcp
success
[root@yumserver ~]# firewall-cmd --reload
success

 备注:必要时可以运行 systemctl restart httpd 重启一下服务。

6.3、关闭selinux(SELINUX=disabled)

[root@yumserver ~]# vi /etc/selinux/config 

CentOS7.9 搭建内部yum源服务器同步阿里yum源插图

6.4、配置httpd.conf文件

[root@yumserver ~]# vi /etc/httpd/conf/httpd.conf
DocumentRoot "/mirror/"
<Directory "/mirror/">
    Options Indexes FollowSymLinks
    AllowOverride  None
    Order allow,deny
    Allow from all
    Require all granted
</Directory>

 注意:上面配置的httpd.conf文件,需要找到如下图DocumentRoot字样的行进行更改,而不是直接复制粘贴插入。

CentOS7.9 搭建内部yum源服务器同步阿里yum源插图1

6.5、修改web界面的 index.html 文件

###修改Apache默认首页index.html,直接复制粘贴执行
cat << EOF > /usr/share/httpd/noindex/index.html
<!DOCTYPE html>
<html>
<head>
<meta charset="utf-8">
<title>CentOS 7 镜像</title>

<script>document.createElement("myHero")</script>
<style>
myHero {
        display: block;
        background-color: #ddd;
        padding: 10px;
        font-size: 20px;
} 
</style> 

</head>
<body>
    <h1>简介</h1>
    <hr>
    <p>CentOS,是基于 Red Hat Linux 提供的可自由使用源代码的企业级 Linux 发行版本,是一个稳定,可预测,可管理和可复制的免费企业级计算平台。</p>
    <hr>
    <br>
    <br>

        <h1>CentOS 7 配置内部YUM源</h1>
    <br>
        <h2>1、备份</h2>
        <myHero>mkdir /etc/yum.repos.d/backup</myHero>
        <myHero>mv /etc/yum.repos.d/*.repo /etc/yum.repos.d/backup/</myHero>
    <br>
        <h2>2、下载新的 CentOS-Base.repo 到 /etc/yum.repos.d/ </h2>
        <myHero>curl -o /etc/yum.repos.d/CentOS-Base.repo http://xx.xx.xx.xx/repo/CentOS-Base.repo</myHero>
    <br>
        <h2>3、运行 yum makecache 生成缓存</h2>
    <br>
        <h2>4、运行 yum repolist   查看已经生成缓存</h2>
    <br>
    <br>

</body>
</html>
EOF

注意: 上文中的 http://xx.xx.xx.xx 填写自身yum源服务器的ip地址。

七、编写yum源客户端配置文件

创建repo文件夹

[root@yumserver ~]# mkdir -p /mirror/repo/
###复制粘贴执行,注意:xx.xx.xx.xx需要更改为服务器ip地址。

[root@yumserver ~]# cat << EOF > /mirror/repo/CentOS-Base.repo

[base]
name=CentOS- Base - xx.xx.xx.xx
failovermethod=priority
baseurl=http://xx.xx.xx.xx/base/
enable=1
gpgcheck=0
 
#released updates 
[updates]
name=CentOS- Updates - xx.xx.xx.xx
failovermethod=priority
baseurl=http://xx.xx.xx.xx/updates/
enable=1
gpgcheck=0
 
#additional packages that may be useful
[extras]
name=CentOS- Extras - xx.xx.xx.xx
failovermethod=priority
baseurl=http://xx.xx.xx.xx/extras/
enable=1
gpgcheck=0
 
#additional packages that may be useful
[epel]
name=CentOS- Epel - xx.xx.xx.xx
failovermethod=priority
baseurl=http://xx.xx.xx.xx/epel/
enable=1
gpgcheck=0
EOF

八、客户端配置yum

登录客户端操作系统执行以下命令(注意:xx.xx.xx.xx为yum源服务器的ip地址)

[root@client ~]# mkdir /etc/yum.repos.d/backup/
[root@client ~]# mv /etc/yum.repos.d/* /etc/yum.repos.d/backup/
[root@client ~]# curl -o /etc/yum.repos.d/CentOS-Base.repo http://xx.xx.xx.xx/repo/CentOS-Base.repo
[root@client ~]# yum makecache

用户也可以用浏览器访问 http://xx.xx.xx.xx 查看配置客户端yum源的方法

CentOS7.9 搭建内部yum源服务器同步阿里yum源插图2

 九 、设置定时同步yum源的任务

编辑脚本

[root@yumserver ~]# cat  /mirror/script/centos_yum_update.sh
#!/bin/bash
echo 'Updating Aliyum Source'
DATETIME=`date +%F_%T`
exec > /var/log/aliyumrepo_$DATETIME.log
reposync -np /mirror
if [ $? -eq 0 ];then
 createrepo --update /mirror/base
  createrepo --update /mirror/extras
   createrepo --update /mirror/updates
   createrepo --update /mirror/epel
    echo "SUCESS: $DATETIME aliyum_yum update successful"
    else
     echo "ERROR: $DATETIME aliyum_yum update failed"
    fi

添加定时任务,每周一凌晨1点执行

[root@yumserver ~]# crontab -l
0 1 * * 1 /bin/bash /mirror/script/centos_yum_update.sh

至此,结束。。。


问题:有时服务器端的yum源仓库索引没有更新成功。
手动更新:
[root@yumserver ~]# createrepo --update /mirror/base/
[root@yumserver ~]# createrepo --update /mirror/extras/
[root@yumserver ~]# createrepo --update /mirror/updates/
[root@yumserver ~]# createrepo --update /mirror/epel/
自用VPS一键脚本工具箱,一个脚本搞定大部分需求

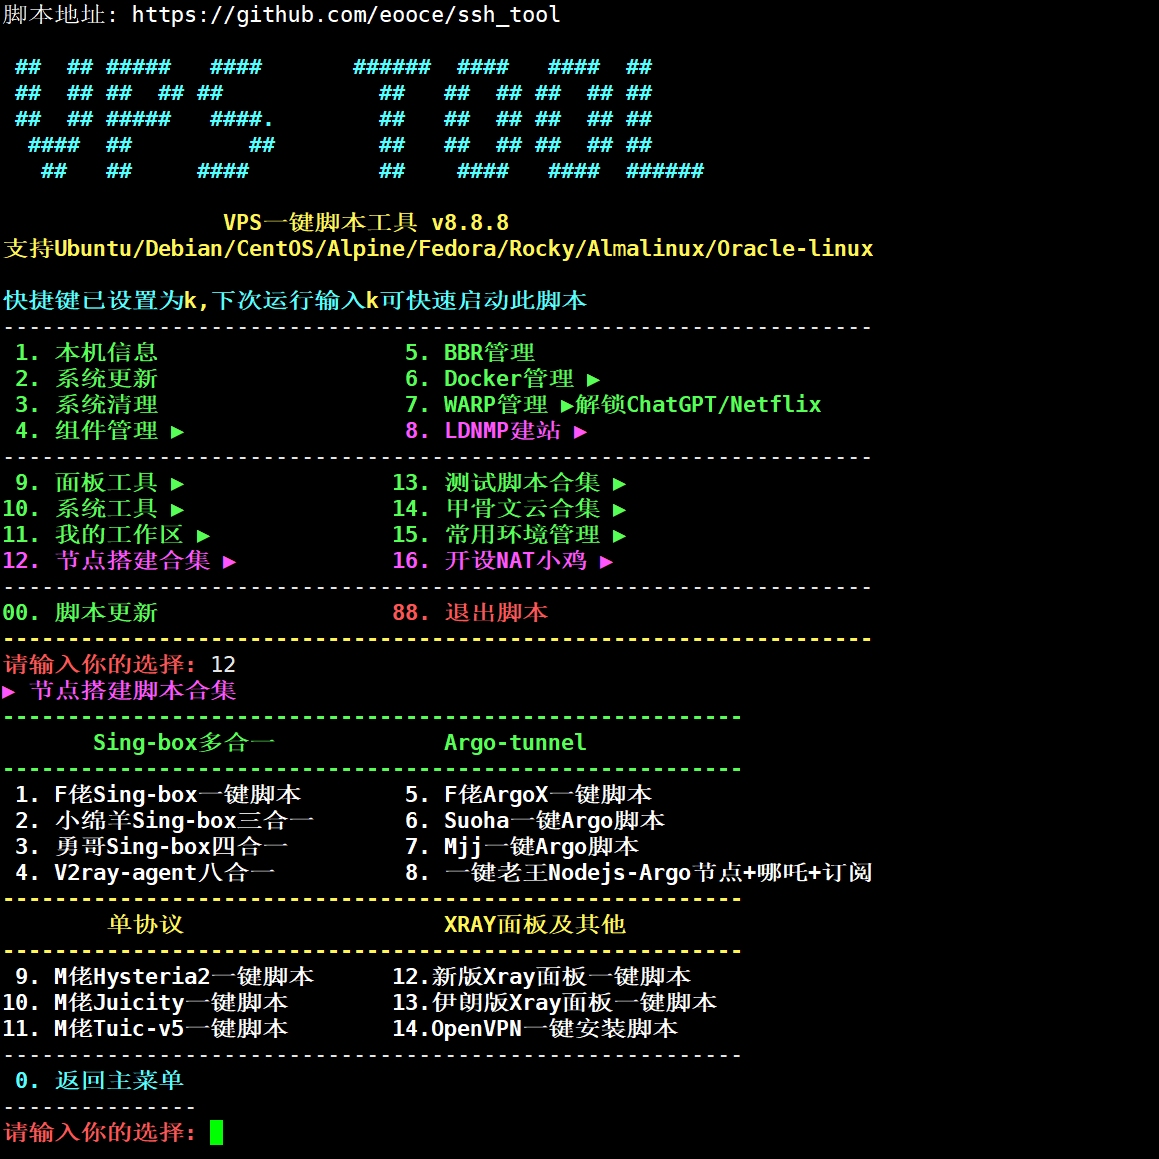
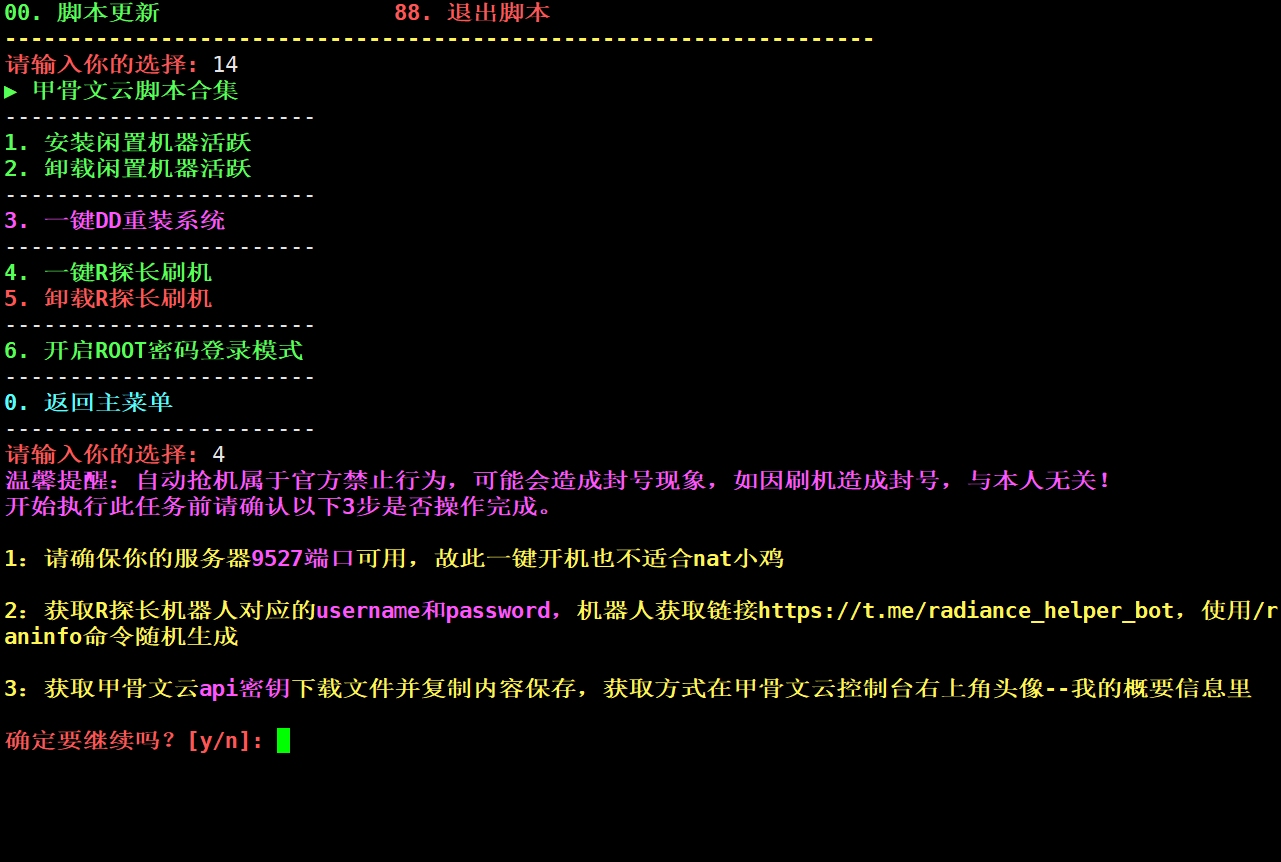
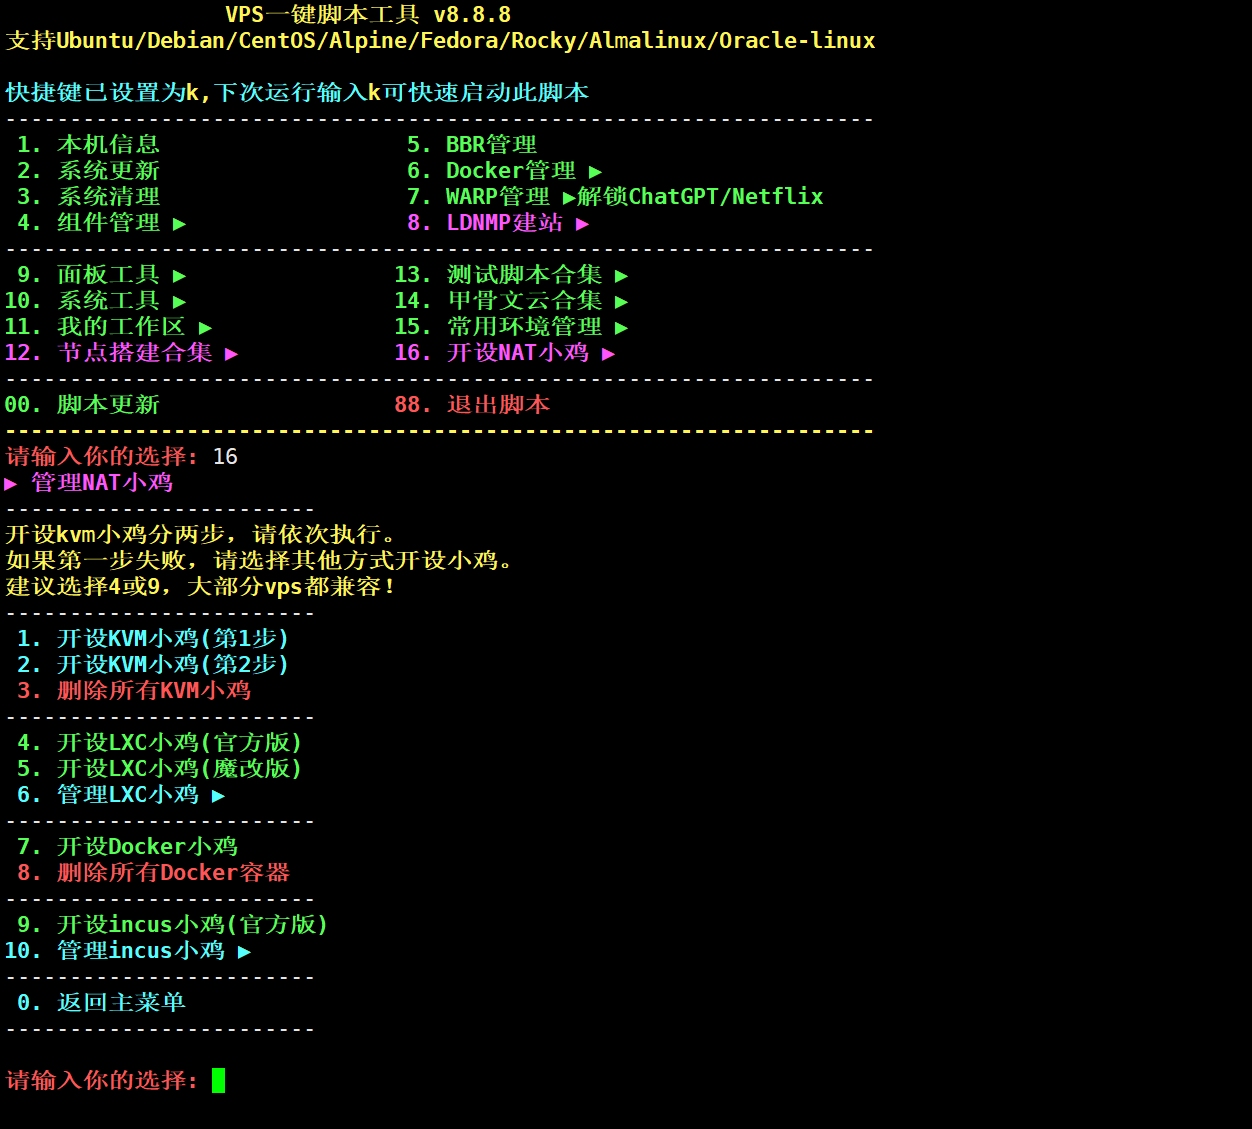
自用VPS一键脚本工具箱,一个脚本搞定大部分需求,废话不多说,上脚本

curl -fsSL https://raw.githubusercontent.com/eooce/ssh_tool/main/ssh_tool.sh -o ssh_tool.sh && chmod +x ssh_tool.sh && ./ssh_tool.sh

wget -qO ssh_tool.sh https://raw.githubusercontent.com/eooce/ssh_tool/main/ssh_tool.sh && chmod +x ssh_tool.sh && ./ssh_tool.sh

部分功能展示图如下,更多功能自行查看,最近会陆续添加更多实用功能,使用时自行更新脚本

若提示curl或wget未找到,说明vps上未安装此依赖,安装后再运行即可,对应系统安装命令如下:

Ubuntu/Debian:apt-get install -y curl wget

Alpine:apk add curl wget

Fedora:dnf install -y curl wget

CentOS/Rocky/Almalinux/Oracle-linux/Amazon-linux:yum install -y curl wget

wget 递归下载整个网站(网站扒皮必备)

有时间看到别人网站的页面比较漂亮,就想给扒皮下来,学习学习。分享一个我常用网站扒皮命令wget

这个命令可以以递归的方式下载整站,并可以将下载的页面中的链接转换为本地链接。

wget加上参数之后,即可成为相当强大的下载工具。

wget命令详解

wget -r -p -np -k http://xxx.com/xxx

-r, –recursive(递归) specify recursive download.(指定递归下载)

-k, –convert-links(转换链接) make links in downloaded HTML point to local files.(将下载的HTML页面中的链接转换为相对链接即本地链接)

-p, –page-requisites(页面必需元素) get all images, etc. needed to display HTML page.(下载所有的图片等页面显示所需的内容)

-np, –no-parent(不追溯至父级) don’t ascend to the parent directory.

另外断点续传用-nc参数 日志 用-o参数

拿我自己的网站扒皮试一下吧

执行 wget -r -p -np -k http://www.phpernote.com/ 命令

wget 递归下载整个网站(网站扒皮必备)一

等网站递归下载完毕,你会发现你当前目录会有一个 www.phpernote.com/ 的目录

进入这个目录看一下

wget 递归下载整个网站(网站扒皮必备)二

熟练掌握wget命令,可以帮助你扒皮网站。

iptables封禁BT/PT/SPAM(垃圾邮件)和自定义端口/关键词一键脚本

说明:通常我们买的VPS如果乱发垃圾邮件(SPAM)和下载BTPT等都会导致VPSIDC封杀。按照博主的经验来看发垃圾邮件被封杀几率是非常大的,不过对于BTPT来说,有的商家虽然有规定不许下载,但都是睁一只眼闭一只眼,只要不被投诉就没事。但还是要注意点,特别是喜欢分享55R等梯子的人,最好都给封上,以防万一。

安装

注意:本脚本邮件端口是完全可以封住的,但是BTPT就不是100%的了,封不干净,这个没办法。
系统要求:CentOS 6+/Debian 6+/Ubuntu 14.04 +

wget -N --no-check-certificate https://raw.githubusercontent.com/ToyoDAdoubiBackup/doubi/master/ban_iptables.sh && chmod +x ban_iptables.sh && bash ban_iptables.sh

运行脚本后会出现脚本操作菜单,选择并输入对应的数字来操作。

提示:既然是iptables防火墙规则,那VPS肯定是要安装iptables的,不过一般都安装的有,除了坑爹的CentOS 7需要关闭自带的防火墙安装iptables

使用说明

进入下载脚本的目录并运行脚本:

./ban_iptables.sh

然后选择你要执行的选项即可。

 iptables防火墙 封禁管理脚本 [vX.X.X]
 -- Toyo | doub.io/shell-jc2 --
 
 0. 查看 当前封禁列表
————————————
 1. 封禁 BT、PT
 2. 封禁 SPAM(垃圾邮件)
 3. 封禁 BT、PT+SPAM
 4. 封禁 自定义 端口
 5. 封禁 自定义关键词
————————————
 6. 解封 BT、PT
 7. 解封 SPAM(垃圾邮件)
 8. 解封 BT、PT+SPAM
 9. 解封 自定义 端口
10. 解封 自定义关键词
11. 解封 所有  关键词
————————————
12. 升级脚本
 
请输入数字 [0-11]:

其他操作

为了方便,我也做了几个快捷的命令,不需要进入菜单去选择对应的选项,直接就能封禁/解封。

./ban_iptables.sh banbt
# 封禁 BT、PT
 
./ban_iptables.sh banspam
# 封禁 SPAM(垃圾邮件)
 
./ban_iptables.sh banall
# 封禁 BT、PT+SPAM
 
./ban_iptables.sh unbanbt
# 解封 BT、PT
 
./ban_iptables.sh unbanspam
# 解封 SPAM(垃圾邮件)
 
./ban_iptables.sh unbanall
# 解封 BT、PT+SPAM

脚本地址:https://doub.io/shell-jc2/

Fikkerd-3.7.6-Linux/Windows-x86-64全功能不完整破解开心版

Fikkerd是一款面向CDN/站长的专业级网站缓存和反向代理服务器软件,由于免费版受限很多,导致很多功能都用不了,现在有大佬发出了Fikker 3.7.6授权全功能破解版,不过破解并不是很完整。

Linux版本

wget https://kbssj.com/wp-content/uploads/2020/06/fikkerd-3.7.6-linux-x86-64.tar.gz
tar zxvf fikkerd-3.7.6-linux-x86-64.tar.gz
cd fikkerd-3.7.6-linux-x86-64/
chmod +x ./bin/fikkerd
./fikkerd.sh install
./fikkerd.sh start

完成后访问http://IP:6780,初始密码为123456,如果打不开,开启端口即可。

如果防火墙使用的iptables(Centos 6)

iptables -I INPUT -p tcp --dport 80 -j ACCEPT
iptables -I INPUT -p tcp --dport 443 -j ACCEPT
iptables -I INPUT -p tcp --dport 6780 -j ACCEPT
service iptables save
service iptables restart

如果使用的是Firewall(CentOS 7)

firewall-cmd --zone=public --add-port=80/tcp --permanent 
firewall-cmd --zone=public --add-port=443/tcp --permanent 
firewall-cmd --zone=public --add-port=6780/tcp --permanent  firewall-cmd --reload

最后破解不彻底的解决办法 ,没8个小时重启一下fikkerPHP

echo "0 */8 * * * /etc/init.d/fikkerd restart " >>/etc/crontab

其它常用一键脚本

停止 Fikker 程序的一键脚本:
service fikkerd stop ; sleep 5 ; echo 'finished!'

启动 Fikker 程序的一键脚本:
service fikkerd start ; sleep 5 ; echo 'finished!'

重启 Fikker 程序的一键脚本:
service fikkerd restart ; sleep 5 ; echo 'finished!'

完全卸载/完全删除 Fikker 程序的一键脚本(默认安装在 /root 目录下面):
cd /root && cd fikkerd-3.?.?-linux-x86-?? && ./fikkerd.sh stop 2> /dev/null ; sleep 2 ; ./fikkerd.sh uninstall ; cd /root && rm -rf fikkerd-3.?.?-linux-x86-?? && echo 'finished!'

Windows版本

Fikker 服务说明:

  1. 注册服务.bat – 将 Fikker 注册成系统服务. 注: 操作系统重启后会自动运行.
  2. 运行服务.bat – 如果已经注册服务, 则立即运行 Fikker 服务.
  3. 停止服务.bat – 如果 Fikker 服务正在运行, 则立即停止运行 Fikker 服务.
  4. 注销服务.bat – 如果已经注册服务, 则从系统服务列表中注销.
  5. 转自:https://kbssj.com/2020/06/06/fikkerd-3-7-6-linux-x86-64%E5%85%A8%E5%8A%9F%E8%83%BD%E4%B8%8D%E5%AE%8C%E6%95%B4%E7%A0%B4%E8%A7%A3%E5%BC%80%E5%BF%83%E7%89%88/

大陆服务器安装docker的临时方法

1. 安装方式一

1.1 自用VPS初始设置脚本

自带docker和docker-compose安装

 # bash <(wget -qO- --no-check-certificate https://fastly.jsdelivr.net/gh/okxlin/ToolScript@main/tools/vps-setup.sh)
# bash <(wget -qO- --no-check-certificate https://gcore.jsdelivr.net/gh/okxlin/ToolScript@main/tools/vps-setup.sh)
# bash <(wget -qO- --no-check-certificate https://testingcf.jsdelivr.net/gh/okxlin/ToolScript@main/tools/vps-setup.sh)
# bash <(wget -qO- --no-check-certificate https://cdn.jsdelivr.net/gh/okxlin/ToolScript@main/tools/vps-setup.sh)
bash <(wget -qO- --no-check-certificate https://mirror.ghproxy.com/https://github.com/okxlin/ToolScript/raw/main/tools/vps-setup.sh)

2. 安装方式二

bash <(curl -sSL https://linuxmirrors.cn/docker.sh)

Linux VPS一键屏蔽指定国家所有的IP访问

说明:对于屏蔽指定国家所有的IP的手动教程已经讲了,查看:Linux VPS使用ipset快速屏蔽指定国家的IP访问,虽然步骤很简单,但为了更白的小白,博主写了个一键脚本,这里分享下。

提示:据一些同学需求,博主也发了个白名单教程,查看:使用ipset设置防火墙端口白名单,只让指定国家访问

使用

本脚本适用于CentOSDebianUbuntu等常用系统。

使用root运行以下命令:

wget https://www.moerats.com/usr/shell/block-ips.sh
chmod +x block-ips.sh
./block-ips.sh

封禁ip时会要求你输入国家代码,代码查看:点击进入。记住所填参数均为小写字母。比如JAPAN (JP),我们就输入jp这个参数。

演示

1、封禁IP
请输入图片描述

2、查看封禁列表
请输入图片描述

3、解封IP
请输入图片描述

总结

一键屏蔽可以有效帮我们暂时防止一些CC攻击等,或者你不想让哪国的人进入博客也可以用,注意屏蔽cn的时候需谨慎,不然你SSH就上不去了。


转自:https://www.moerats.com/archives/585/

Centos8和RockyLinux 重启网卡命令

在centos8和现在刚出的RockyLinux里面通过 systemctl start network 已经不行了,提示找不到network,因为命令改变了,同样centos8上最小化安装ifconfig 这个命令也没了,不过ip a 查看IP地址还可以

通用的命令

ifdown ens33  关闭网卡名叫ens33的网卡

ifup ens33      开启网卡名叫ens33的网卡

查看IP地址

ip a

Centos8和RockyLinux 管理网卡新命令 nmcli


connectionc都可以


1、重载网卡 ,重启网卡之前一定要重新载入一下配置文件,不然不能立即生效

nmcli connection reload 

2、开启网卡

nmcli c up ens33

3、关闭网卡

nmcli c down ens33

4、显示网卡的配置信息和运行状态

nmcli

5、查看网卡的状态

nmcli device status

6、查看所有网卡设备详细信息

nmcli device show

7、查看ens33网卡设备详细信息

nmcli device show ens33

8、直接添加一个IP地址10.0.0.200

nmcli c modify ens33 +ipv4.address 10.0.0.200/8
使其生效
nmcli c up ens33

OVH独立服务器/VPS添加新IP

若添加单个IP

cd /etc/sysconfig/network-scripts/

vi ifcfg-eth0:0

DEVICE="eth0:0"
ONBOOT=yes
BOOTPROTO=static
IPADDR="你的IP"
NETMASK="255.255.255.255"
BROADCAST="你的IP"

如果还有其他IP

vi ifcfg-eth0:1

设置完成后重启网络

service network restart

centos8/rocky Linux8的网卡重启命令:

nmcli connection reload 

查看网卡绑定情况
ip addr show eth0

Justhost:一款提供俄罗斯低价的VPS服务商

俄罗斯公司baxet llc(成立于2006~)旗下的justhost这几年在中国国内应该是比较火爆的,具体大致猜测原因有这么几个:(1)价格便宜,一个月不到8块钱;(2)不限流量,最低给200M带宽,允许你作死跑,当然不支持违规使用;(3)有大家喜欢的俄罗斯远东机房,还有那个莫斯科dataline没事儿机房给你带上个CN2 GT;(4)信用卡、PayPal、支付宝等可方便付款。

官网:https://justhost.ru


作为RIPE成员、自有AS51659,运作着俄罗斯境内的6个数据中心的业务,包括虚拟主机、VPS、独立服务器等,低至8元/月,最低都是200M带宽,而且不限流量,VPS还是KVM虚拟的!

电信选莫斯科dataline机房,联通选adman机房,移动最好是dataline机房。价格便宜,VPS稳定,网络是否适合你,还需要你自己亲自试验才知道。

现在正是以最实惠的价格订购功能最强大 VPS 计划的最佳时机!

限时优惠!所有促销代码将于11 月 15 日到期— 不要错过!?

在全球 27 个国家/地区的 38 个地点的所有 VPS 位置上享受超值折扣!选择适合您需求的促销代码:

  • 优惠码:VPSONE90 — 1 个月享受90% 折扣
  • 优惠代码:VPSTHREE70 — 3 个月享受70% 折扣
  • 优惠码:VPSSIX60 — 6 个月享受60% 折扣

立即订购您的 VPS,享受我们广泛的全球覆盖范围!?

*此优惠适用于使用促销代码的前 1000 个 VPS 订单,不适用于 PROMO VPS 计划。促销代码仅可使用一次。*

PQS 1111限定商品优惠专区!

PQS,台湾商家,主要提供台湾VPS和香港VPS(台湾BGP、深台IPLC、韩国KT家宽、台湾Hinet家宽、香港BGP、香港HKT家宽、香港HKBN家宽),有独立IP和NAT,根据需要选择。现在新推出了苏州BGP东京IPLC防御NAT,并有一定防护。

官网:https://pqs.pw/

PQS限定商品优惠 年缴低至 5.811 折!

优惠期间: 11/11(一) 15:00 ~ 11/15(五) 15:00

??限定特惠产品:
?沪日IPLC(端内25ms) 全系列产品
https://www.pqs.pw/cart.php?gid=95
?上海CN2 | SHH-200M-VDS-M
https://www.pqs.pw/cart.php?gid=35
?香港 | HKBN-500M-VDS-M
https://www.pqs.pw/cart.php?gid=10
?香港 | HKT-500M-VDS-S
https://www.pqs.pw/cart.php?a=add&pid=563
?香港 | HKT-1G-VDS-M
https://www.pqs.pw/cart.php?a=add&pid=520

限定商品专属优惠码:
月缴: PQS2024-1111-SP-MON 8.411折
季缴: PQS2024-1111-SP-SEA 7.411折
半年: PQS2024-1111-SP-HFY 6.811折
年缴: PQS2024-1111-SP-YEA 5.811折

‼️本檔双十一活动注意事项
1. 所有优惠限新购(旧机器无法套用)
2. 使用优惠码 无法退费